In this post I explain how to implement the authentication in ShinyProxy with IdentityServer. Recently, I wrote some posts about ShinyProxy and ShinyApps:
- Deploy ShinyApps with Azure and Docker
- Deploying dockerized R/Shiny Apps on Microsoft Azure
- Getting started with R
Table of contents
What is ShinyProxy?
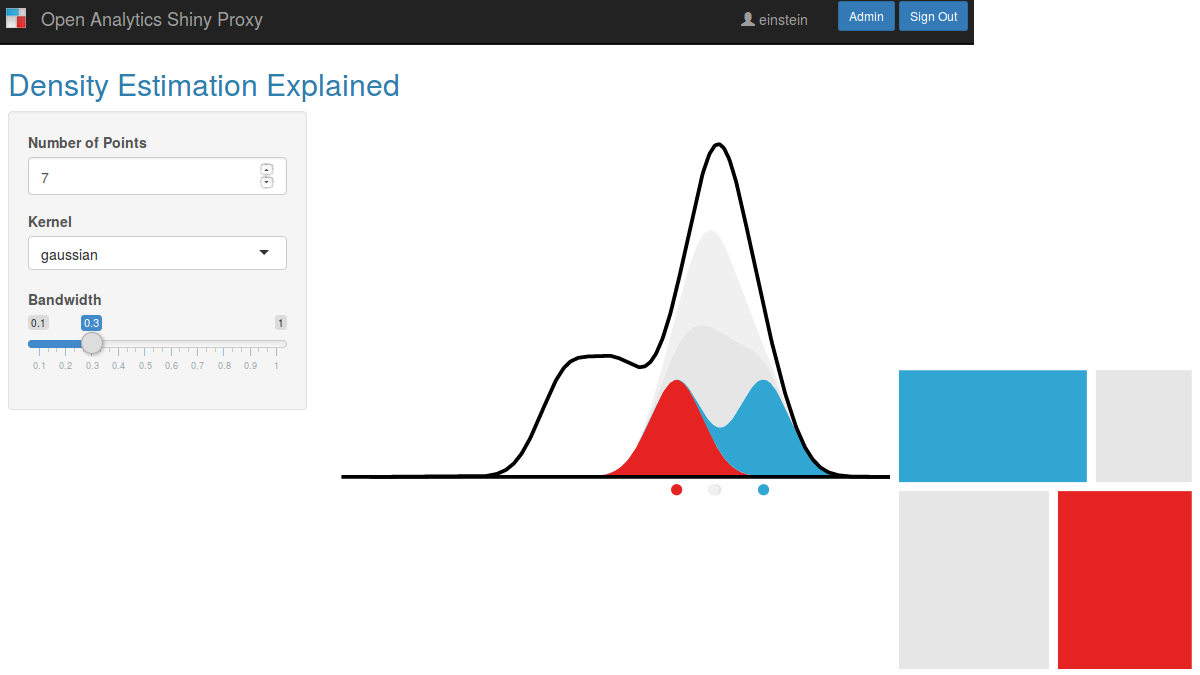
First, ShinyProxy is the way to deploy Shiny apps in an enterprise context. It has built-in functionality for LDAP authentication and authorization, makes securing Shiny traffic (over TLS) a breeze and has no limits on concurrent usage of a Shiny app. This tool is open-source.
So, a ShinyProxy can host more than one Shiny app at the same time. As I explained in my previous post Deploy ShinyApps with Azure and Docker, ShinyProxy in in a Docker container and for each Shiny app there is a container too. In Docker, we have to create a virtual network between the ShinyProxy and all the ShinyApps.

In this way, users have only one access to all the apps. ShinyProxy shows the list of the applications in the home page. To set the application, we have to change the application.yml. A basic configuration is this one.
proxy:
  port: 8080
  authentication: simple
  admin-groups: admins
  users:
  - name: jack
    password: password
    groups: admins
  - name: jeff
    password: password
  docker:
    url: https://localhost:2375
  specs:
  - id: 01_hello
    display-name: Hello Application
    description: Application which demonstrates the basics of a Shiny app
    container-cmd: ["R", "-e", "shinyproxy::run_01_hello()"]
    container-image: openanalytics/shinyproxy-demo
  - id: 06_tabsets
    container-cmd: ["R", "-e", "shinyproxy::run_06_tabsets()"]
    container-image: openanalytics/shinyproxy-demo

logging:
  file:
    shinyproxy.log
Then, in the app section you have the list of the apps with these values:
- id: this identifies the app (it can’t have spaces or special characters)
- container-image: the Docker image ShinyProxy has to use for the ShinyApp
- container-cmd: the command to run a ShinyApp
- description: here we can specify a description for this app that it will be displayed under the display-name
- display-name: this is the title of the app
- container-network: this is the network that Docker establishes to allow ShinyProxy to communicate with the ShinyApps
- groups: this specifies the type of people can see and access to a ShinyApp (only for the simple authentication)
- access-group: this specifies what roles users must have to access to a ShinyApp (only for OAuth authentication)
For more details, you can read the documentation or see more links at the end of this post.
Configure IdentityServer
First, in this section I won’t explain how to create your IdentityServer: there are a lot of documentation for that but also if you have some questions, you can ask to a developer, search on internet or use our forum.
So, what is IdentityServer? IdentityServer is a .NET framework which allows you to develop an identity solution, using the OpenID connect protocol an extension to OAuth 2.0.
Using this library, you can provide a single sign on solution, a process which centralizes the authentication of your users into one location, allowing you to provide a secure and robust solution to user identity and authentication.
Therefore, I have created a post titled Implement security workflow with Identity Server where you can have a good idea of what IdentityServer can do for you.
What is OAuth 2.0
OAuth 2.0 is the industry-standard protocol for authorization. OAuth 2.0 focuses on client developer simplicity while providing specific authorization flows for web applications, desktop applications, mobile phones, and living room devices. This specification and its extensions are being developed within the IETF OAuth Working Group.
Understand OpenID Connect
Before to use authentication in ShinyProxy with IdentityServer, we have to understand what OpenID Connect provides us.

OpenID Connect (OIDC) is an authentication protocol built on OAuth 2.0 that you can use to securely sign in a user to an application. When you use the Microsoft identity platform’s implementation of OpenID Connect, you can add sign-in and API access to your apps. This article shows how to do this independent of language and describes how to send and receive HTTP messages without using any Microsoft open-source libraries.
OpenID Connect extends the OAuth 2.0 authorization protocol for use as an authentication protocol, so that you can do single sign-on using OAuth. OpenID Connect introduces the concept of an ID token, which is a security token that allows the client to verify the identity of the user. The ID token also gets basic profile information about the user. It also introduces the UserInfo endpoint, an API that returns information about the user.
OpenID Connect describes a metadata document (RFC) that contains most of the information required for an app to do sign in. This includes information such as the URLs to use and the location of the service’s public signing keys. You can find this document by appending the discovery document path to the authority URL: /.well-known/openid-configuration
Configure a new client
So, the first part of the authentication is to create a client for the authentication with ShinyProxy in IdentityServer. What we need from this configuration is a clientId and a clientSecret.
The following steps are for the IdenityServer4 UI. If you start a new project with IdentityServer in Visual Studio, you have to add the code for a new client with the same values.

After this first step, I have to define the scope of the application, the redirect Uris, the grant type and choose a client secret. To do that, from the new client page, click on the Basics tab.

The allowed scopes you have to select are:
- openid
- profile
- roles
In redirect Uris, you have to add the URL of your ShinyProxy following by /login/oauth2/code/shinyproxy for example
https://127.0.0.1:8080/login/oauth2/code/shinyproxy
So, the last part is the allowed grant types. The minimum you have to choose is authorization_code. If you want to test IdentityServer with Postman, for example, my advice is to add also password and client_credentials.
Next step, click on Authentication/Logout. This configuration is pretty simple, leave everything as default. As Logout Uri, type the URL of your ShinyProxy.

Finally, the last step on the Token tab and here you have to add the URLs for Allowed Cors Origins. Then, save all settings clicking on Save Client.

Cross-origin resource sharing (CORS) is a browser mechanism which enables controlled access to resources located outside of a given domain. It extends and adds flexibility to the same-origin policy (SOP). However, it also provides potential for cross-domain based attacks, if a website’s CORS policy is poorly configured and implemented. CORS is not a protection against cross-origin attacks such as cross-site request forgery (CSRF).
Add client secret
Now, we have to add the client secret. For that, in the client page, click on the Basics tab and at the end of the page click on Manage Client Secrets. From the UI, you can add more than one secret. So, type your Secret Value and click on Add Client Secret. There are more configuration there but I ignore them.

Add roles to a user
So, roles and users. In IdentityServer you can have internal users or user from external providers like Active Directory or Facebook. In both ways, IdentityServer creates local user and then you can add roles to this user.
Then, you can think a role like the classic administrator, read-only, editor. In the prospective of the ShinyProxy, we can create a role for each app and add this role to the user.
For example, I added to my personal user, 2 specific roles for 2 projects alias 2 ShinyApps (in the following image the roles are 200056-user and 200145-user).

So, we have almost everything for the ShinyProxy configuration.
Create a new client from code
For that you have to change the file Config.cs like that:
public static IEnumerable<Client> GetClients()
{
    return new List<Client>
    {
        // other clients omitted...

        new Client
        {
            ClientId = "ShinyProxy",
            ClientName = "ShinyProxy",
            ClientSecrets = new List<Secret> { new Secret("secret".Sha256()) },

            AllowedGrantTypes = GrantTypes.Implicit,

            // where to redirect to after login
            RedirectUris = { "https://localhost:8080/login/oauth2/code/shinyproxy" },

            // where to redirect to after logout
            PostLogoutRedirectUris = { "https://localhost:8080" },

            AllowedCorsOrigins = { "https://localhost:8080" },

            AllowedScopes = new List<string>
            {
                IdentityServerConstants.StandardScopes.OpenId,
                IdentityServerConstants.StandardScopes.Profile,
                IdentityServerConstants.StandardScopes.Roles
            }
        }
    };
}
Identity Server Discovery Document
For the ShinyProxy configuration, we must know some configuration’s URLs from IdentityServer. For that, we use the Discovery Document that IdentityServer provides on this link
https://identityserverurl/.well-known/openid-configuration
So, in this document you have all the information we need and in particular:
- auth-url
- token-url
- jwks-url
- logout-url
An example of this file is the following:
{
  "issuer": "https://identityserverurl",
  "jwks_uri": "https://identityserverurl/.well-known/openid-configuration/jwks",
  "authorization_endpoint": "https://identityserverurl/connect/authorize",
  "token_endpoint": "https://identityserverurl/connect/token",
  "userinfo_endpoint": "https://identityserverurl/connect/userinfo",
  "end_session_endpoint": "https://identityserverurl/connect/endsession",
  "check_session_iframe": "https://identityserverurl/connect/checksession",
  "revocation_endpoint": "https://identityserverurl/connect/revocation",
  "introspection_endpoint": "https://identityserverurl/connect/introspect",
  "device_authorization_endpoint": "https://identityserverurl/connect/deviceauthorization",
  "frontchannel_logout_supported": true,
  "frontchannel_logout_session_supported": true,
  "backchannel_logout_supported": true,
  "backchannel_logout_session_supported": true,
  "scopes_supported": [
    "roles",
    "openid",
    "profile",
    "email",
    "address",
    "skoruba_identity_admin_api",
    "offline_access"
  ],
  "claims_supported": [
    "role",
    "sub",
    "updated_at",
    "locale",
    "zoneinfo",
    "birthdate",
    "gender",
    "website",
    "picture",
    "preferred_username",
    "nickname",
    "middle_name",
    "given_name",
    "family_name",
    "name",
    "profile",
    "email",
    "email_verified",
    "address"
  ],
  "grant_types_supported": [
    "authorization_code",
    "client_credentials",
    "refresh_token",
    "implicit",
    "password",
    "urn:ietf:params:oauth:grant-type:device_code"
  ],
  "response_types_supported": [
    "code",
    "token",
    "id_token",
    "id_token token",
    "code id_token",
    "code token",
    "code id_token token"
  ],
  "response_modes_supported": [
    "form_post",
    "query",
    "fragment"
  ],
  "token_endpoint_auth_methods_supported": [
    "client_secret_basic",
    "client_secret_post"
  ],
  "id_token_signing_alg_values_supported": [ "RS256" ],
  "subject_types_supported": [ "public" ],
  "code_challenge_methods_supported": [
    "plain",
    "S256"
  ],
  "request_parameter_supported": true
}
From this file, we have to copy the information requested for the ShinyProxy configuration.
Configure ShinyProxy
Finally, we can do the last step for authentication in ShinyProxy with IdentityServer!
Based on the ShinyProxy documentation, bearing in mind the IdentityServer is an OpenId Connection provider.
OpenID Connect is a modern authentication protocol based on the OAuth2 standard. It uses tokens, removing the need to store passwords and offering a single-sign-on experience for desktop, web and mobile apps. More information about OIDC can be found on the OpenID website.
So, to enable the openid authentication, we have to change the application.yml and specify the authentication type and add a new openid section. Then the values for the other keys.
proxy:
  title: Open Analytics Shiny Proxy
  port: 8080

  authentication: openid
  openid:
    auth-url: https://identityserverurl/connect/authorize
    token-url: https://identityserverurl/connect/token
    jwks-url: https://identityserverurl/.well-known/openid-configuration/jwks
    logout-url: https://identityserverurl/Account/Logout?return=https://yourshinyproxy:8080/
    client-id: ShinyProxy
    client-secret: secret
    scopes: [ "openid", "profile", "roles" ]
First, you can copy auth-url, token-url, jwks-url from the Discovery Document. client-id and client-secret are what we assigned when we created a new client. Then, scope is what we decided in the client configuration.
Define the audience
According to RFC 7519, the “aud” (audience) claim identifies the recipients that the JWT is intended for. Each principal intended to process the JWT MUST identify itself with a value in the audience claim. If the principal processing the claim does not identify itself with a value in the “aud” claim when this claim is present, then the JWT MUST be rejected. In the general case, the “aud” value is an array of case- sensitive strings, each containing a StringOrURI value. In the special case when the JWT has one audience, the “aud” value MAY be a single case-sensitive string containing a StringOrURI value. The interpretation of audience values is generally application specific.
Understand audience
The Audience (aud) claim as defined by the spec is generic, and is application specific. The intended use is to identify intended recipients of the token. What a recipient means is application specific. An audience value is either a list of strings, or it can be a single string if there is only one aud claim. The creator of the token does not enforce that aud is validated correctly, the responsibility is the recipient’s to determine whether the token should be used.
Whatever the value is, when a recipient is validating the JWT and it wishes to validate that the token was intended to be used for its purposes, it MUST determine what value in aud identifies itself, and the token should only validate if the recipient’s declared ID is present in the aud claim. It does not matter if this is a URL or some other application specific string. For example, if my system decides to identify itself in aud with the string: api3.app.com, then it should only accept the JWT if the aud claim contains api3.app.com in its list of audience values.
Of course, recipients may choose to disregard aud, so this is only useful if a recipient would like positive validation that the token was created for it specifically.
Audience in the application.yml
Then, we must add the audience in the configuration adding
username-attribute: aud
Roles
Now, we have to tell ShinyProxy to read the roles from the token that IdentityServer generates from the user. For that, we have to add another configuration under openid
roles-claim: role
Define access to Shiny applications
Finally, we are one step away to have our authentication in ShinyProxy with IdentityServer completed!
In the application.yml there is a section called specs where we define that Shiny apps we want to use with our ShinyProxy. In the section above, we define some roles and we said we have a role for each application. To add the role in an app definition, we can user the key access-groups. Now, for example, we can have 2 applications with 2 different roles.
  specs:
  - id: 01_hello
    display-name: Hello Application
    description: Application which demonstrates the basics of a Shiny app
    container-cmd: ["R", "-e", "shinyproxy::run_01_hello()"]
    container-image: openanalytics/shinyproxy-demo
    container-network: sp-example-net
    access-groups: 200122-user
  - id: 06_tabsets
    container-cmd: ["R", "-e", "shinyproxy::run_06_tabsets()"]
    container-image: openanalytics/shinyproxy-demo
    container-network: sp-example-net
    access-groups: 200145-user
In the example above, only the users with the role 200122-user can access the application id 01_hello. However, only the users with the role 200145-user can access the application id 06_tabsets.
Complete example of application.yml
proxy:
  title: Open Analytics Shiny Proxy
  port: 8080

  authentication: openid
  openid:
    auth-url: https://identityserverurl/connect/authorize
    token-url: https://identityserverurl/connect/token
    jwks-url: https://identityserverurl/.well-known/openid-configuration/jwks
    logout-url: https://identityserverurl/Account/Logout?return=https://yourshinyproxy:8080/
    client-id: ShinyProxy
    client-secret: secret
    scopes: [ "openid", "profile", "roles" ]
    username-attribute: aud
    roles-claim: role

  docker:
      internal-networking: true
      # url setting needed FOR WINDOWS ONLY
      # url: https://host.docker.internal:2375

  specs:
  - id: 01_hello
    display-name: Hello Application
    description: Application which demonstrates the basics of a Shiny app
    container-cmd: ["R", "-e", "shinyproxy::run_01_hello()"]
    container-image: openanalytics/shinyproxy-demo
    container-network: sp-example-net
    access-groups: 200122-user
  - id: 06_tabsets
    container-cmd: ["R", "-e", "shinyproxy::run_06_tabsets()"]
    container-image: openanalytics/shinyproxy-demo
    container-network: sp-example-net
    access-groups: 200145-user

logging:
  file:
    opt/shinyproxy/shinyproxy.log

spring:
  servlet:
    multipart:
      max-file-size: 200MB
      max-request-size: 200MB
Conclusion
In conclusion, in this post I show you how to use the authentication in ShinyProxy with IdentityServer and it wasn’t easy to sort it out. I hope this post it will be useful for the ShinyProxy/ShinyApp community.


One thought on “Authentication in ShinyProxy with IdentityServer”