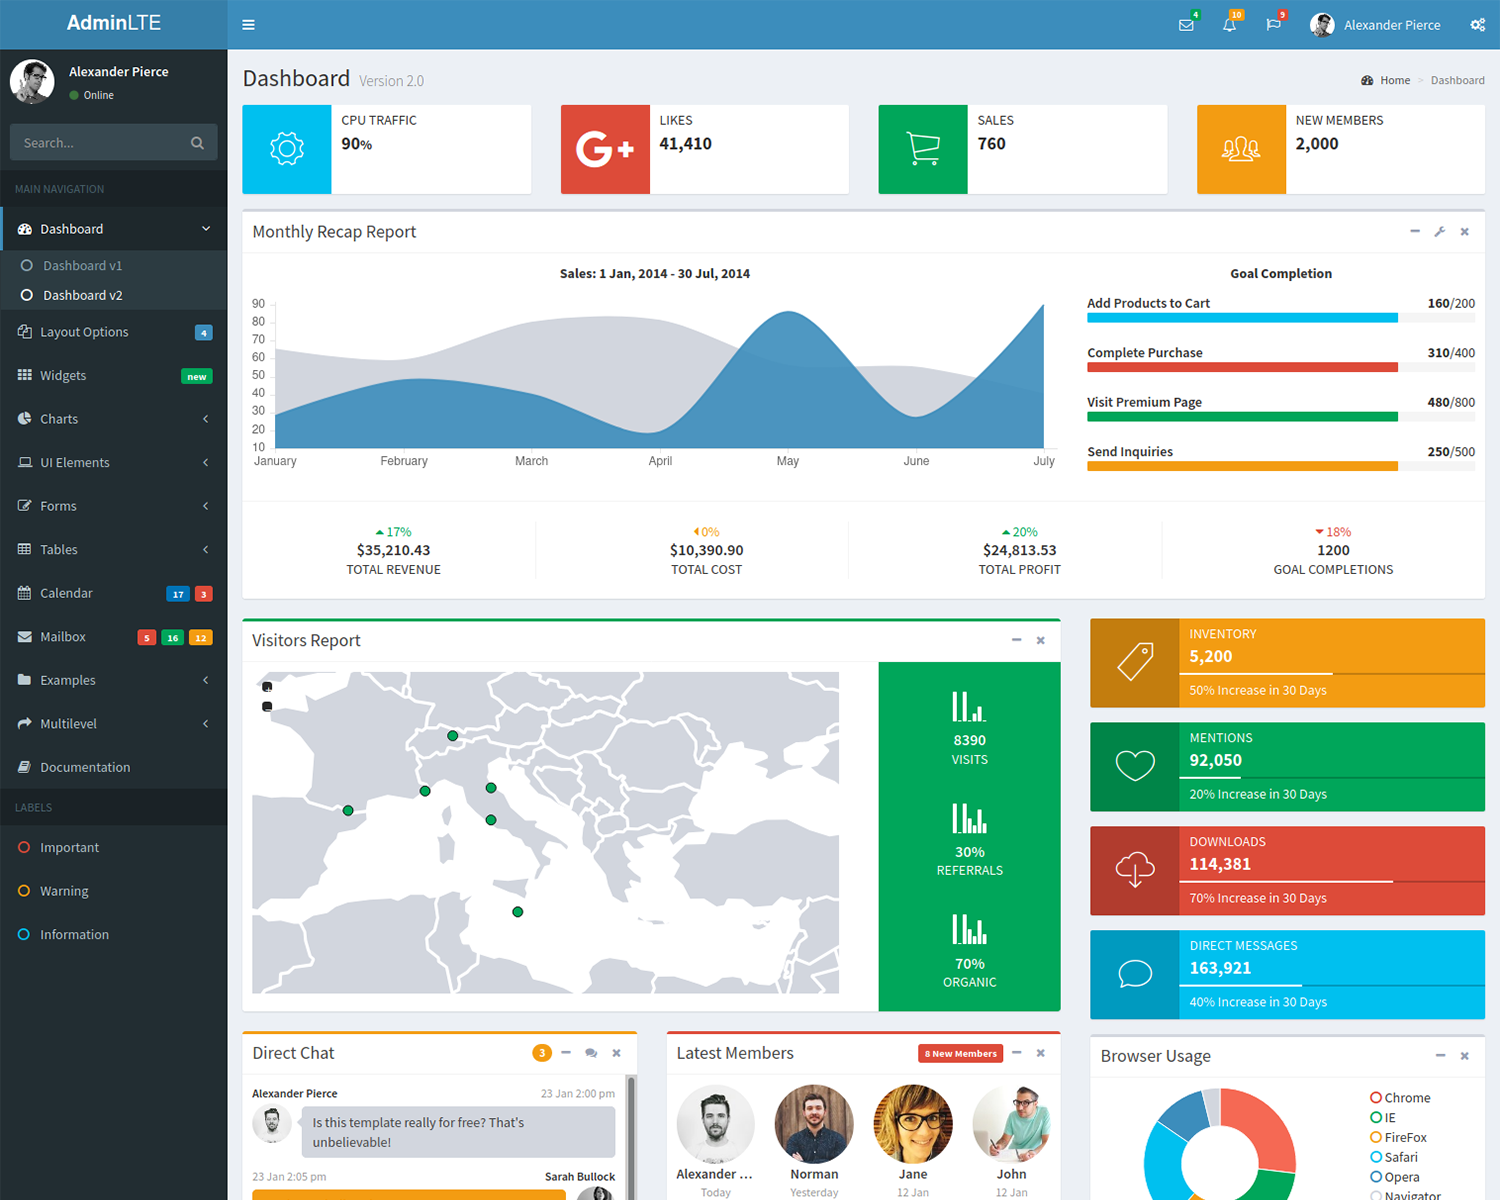
In this new post, I continue to add more features to the integration of AdminLTE with Identity and IdentityServer in AdminLTE project in an ASP.NET Core. In my post 2 posts, I integrated AdminLTE in a ASP.NET Core project and added Features for AdminLTE with ASP.NET Core. The result is pretty cool and it is working.

Then, the source code of the entire project is on GitHub. Please, feel free to send a comment or suggestion in our forum.
This project is working with .NET 3.1. On GitHub you have the project already on
.NET5and it is working with Microsoft Identity.
Generally speaking, every dashboard requires to authenticate users to display the content. What I’m going to do is to add the native Identity to the project and configure the classic login page, password recovery, user details and change the look and feel. After all of that, I will add an option in the configuration, to decide if the authentication is provided by Identity (ASP.NET Core Security) or with an integration with an Identity Server.
Table of contents
Add ASP.NET Core Security Identity
ASP.NET Core enables developers to easily configure and manage security for their apps. ASP.NET Core contains features for managing authentication, authorization, data protection, HTTPS enforcement, app secrets, XSRF/CSRF prevention, and CORS management. These security features allow you to build robust yet secure ASP.NET Core apps.
ASP.NET Core security features
So, ASP.NET Core provides many tools and libraries to secure your apps including built-in identity providers, but you can use third-party identity services such as Facebook, Twitter, and LinkedIn. With ASP.NET Core, you can easily manage app secrets, which are a way to store and use confidential information without having to expose it in the code.
Authentication vs. Authorization
Then, Authentication is a process in which a user provides credentials that are then compared to those stored in an operating system, database, app or resource. If they match, users authenticate successfully, and can then perform actions that they’re authorized for, during an authorization process. The authorization refers to the process that determines what a user is allowed to do.
So, another way to think of authentication is to consider it as a way to enter a space, such as a server, database, app or resource, while authorization is which actions the user can perform to which objects inside that space (server, database, or app).
Common Vulnerabilities in software
ASP.NET Core and EF contain features that help you secure your apps and prevent security breaches. The following list of links takes you to documentation detailing techniques to avoid the most common security vulnerabilities in web apps:
- Cross-Site Scripting (XSS) attacks
- SQL injection attacks
- Cross-Site Request Forgery (XSRF/CSRF) attacks
- Open redirect attacks
Add Identity to the project
Now, ASP.NET Core provides ASP.NET Core Identity as a Razor Class Library. Applications that include Identity can apply the scaffolder to selectively add the source code contained in the Identity Razor Class Library (RCL). You might want to generate source code so you can modify the code and change the behaviour. For example, you could instruct the scaffolder to generate the code used in registration. Generated code takes precedence over the same code in the Identity RCL. To gain full control of the UI and not use the default RCL, see the Microsoft documentation on the section Create full Identity UI source.
Add Identity with Visual Studio
So, I want to create an integration with Identity in AdminLTE project and we read the theory. Now, it is time to add the Microsoft Identity and here you have the steps.
First, right click on the project and select “New Scaffolded Item…” under Add.

After that, the window “Add New Scaffolded Item” is open. Select Identity and click on Add.

Now, we can select only the pages we want to use. I want to use everything in my integration with Microsoft Identity in AdminLTE project. I select all pages. For now, I use as layout page this one ~/Views/Shared/_Layout.cshtml. As Data context class, select or add ApplicationDbContext. Then, press Add.

Then, in few seconds, you have a new bunch of folders and files under Area to manage your users. You are welcome!

So, we can manage accounts now. You have to remember to add a connection string.
At this point, I can tell I have a nice integration with Identity in AdminLTE project. But, to be consistent with the rest of the application, we have to update the layout for the pages outside the authorization. Let’s go!
New _Layout for account pages
Now, in the previous post I created the layout for the pages after the login based on AdminLTE template: some pages are different, for example login page or register page are using a different structure. So, as I did before, I’m going to create a Shared template for those pages:
- ExternalLogins.cshtml
- ConfirmEmail.cshtml
- ExternalLogin.cshtml
- ForgetPassword.cshtml
- ForgotPasswordConfirmation.cshtml
- Login.cshtml
- Register.cshtml
- RegisterConfirmation.cshtml
So, in those pages I’m going to add the right layout. To do that, at the top of the page after the ViewData["Title"] add
@{
    ViewData["Title"] = "Log in";
    Layout = "~/Views/Shared/AdminLTEAccount/_Layout.cshtml";
}
We don’t have right now this file but I’m going to create it now.
AdminLET Account Shared
So, under View > Shared I’m going to create a new folder called AdminLTEAccount. Then, I’m going to create 3 files and their content is as follow.
_Layout.cshtml
@using AdminLTEWithASPNETCore.Extensions
@using AdminLTEWithASPNETCore.Models.UI
<!DOCTYPE html>
<html lang="en">
<head>
    <meta charset="utf-8">
    <meta name="viewport" content="width=device-width, initial-scale=1">
    <title>AdminLTE 3 | Login</title>

    <partial name="AdminLTE/_Styles" />
</head>
<body class="hold-transition login-page">
    <div class="login-box">
        <div class="login-logo">
            <a href="../../index2.html"><b>Admin</b>LTE</a>
        </div>
        <!-- /.login-logo -->
        <div class="card">
            <div class="card-body login-card-body">
                @RenderBody()
            </div>
            <!-- /.login-card-body -->
        </div>
    </div>

    <partial name="AdminLTE/_Scripts" />
    @RenderSection("Scripts", required: false)
</body>
</html>
_Scripts.cshtml
<!-- REQUIRED SCRIPTS -->
<!-- jQuery -->
<script src="~/plugins/jquery/jquery.min.js"></script>
<!-- Bootstrap 4 -->
<script src="~/plugins/bootstrap/js/bootstrap.bundle.min.js"></script>
<!-- AdminLTE App -->
<script src="~/js/adminlte.min.js"></script>
_Style_cshtml
<!-- Google Font: Source Sans Pro -->
<link rel="stylesheet" href="https://fonts.googleapis.com/css?family=Source+Sans+Pro:300,400,400i,700&display=fallback">
<!-- Font Awesome Icons -->
<link rel="stylesheet" href="~/plugins/fontawesome-free/css/all.min.css">
<!-- icheck bootstrap -->
<link href="~/plugins/icheck-bootstrap/icheck-bootstrap.css" rel="stylesheet" />
<!-- Theme style -->
<link rel="stylesheet" href="~/css/adminlte.min.css">
Therefore, if you don’t know what it is going on, you have the complete project on GitHub.
Remember to add your connection string in the appsettings.json
Add DbContext and create the tables
Before anything else, I want to setup the DbContext for the user manager. So, we have to do 3 things:
- add a connection string to the
appsetting.cs - set
AddDbContextin theStartup.cs - be sure the context is created when the application starts
Your connection string should be something similar to this:
Data Source=yourserver;
Initial Catalog=yourdatabase;
Integrated Security=False;
User ID=username;
Password=yourpassword;
Connect Timeout=60;Encrypt=True;
TrustServerCertificate=True;
ApplicationIntent=ReadWrite;
MultipleActiveResultSets=true;
MultiSubnetFailover=False
After that, in the Startup.cs I have to add under ConfigureServices the following code:
services.AddDbContext<ApplicationDbContext>(
    options => options.UseSqlServer(
        Configuration.GetConnectionString("ApplicationDbContextConnection")
    )
);
Probably, if you run the project right now, you will have an error because the tables are not created in the database. I have to add a migration with Entity Framework Core. For that, open a Package Manager Console and type:
enable-migrations
Then, type
Add-Migration CreateIdentitySchema
So, there is a new folder called Migrations with 2 files that allow your project to create the tables in the database.

Finally, I have to tell the project I want to be sure the tables are created before the project starts. For that, in the Startup.cs in the Configure method, I have to change the signature of the method adding the ApplicationDbContext and add
public void Configure(IApplicationBuilder app, IWebHostEnvironment env,
                      ApplicationDbContext db)
{
    if (env.IsDevelopment())
    {
        app.UseDeveloperExceptionPage();
    }
    else
    {
        app.UseExceptionHandler("/Home/Error");
        app.UseHsts();
    }

    // ensure the database is created
    db.Database.EnsureCreated();

    // ..
}
So, I think I can login now. If everything is correct also for you, we can enjoy our new login page.

Well done! So, our users can register and login in the application. Although, there is not validation for the new users. Microsoft Identity gives us the option to implement in our project IEmailSender to send email for validating the users.
Account confirmation and password recovery in ASP.NET Core
For security reasons, it is nice to send an email when a new user has registered in our website to avoid trolls and spam. There are a lot of documentation on the Microsoft Docs but the example is for implementing SendGrid. That is cool but I don’t want to spend money and then I should prefer to use Microsoft Outlook services. Am I wrong?
Update appsettings.json
First, I want to save the configuration in the appsettings.json. So, I’m going to add the following code:
"SmtpCredentials": {
  "MailFrom": "",
  "Username": "",
  "Password": "",
  "Server": "smtp-mail.outlook.com",
  "Port": 587,
  "EnableSSL": true
}
If you are not sure how to add this configuration, please take a look at the full code on GitHub. What I added in the configuration is that:
- MailFrom: the sender of the email. It could be different from your Outlook email
- Username: this is your email with Outlook (for authorization)
- Password: this is your password for your email with Outlook (for authorization)
- Server: the SMTP server you want to use to send your messages. In my example, I use Outlook.com
- Port: what port the SMTP server uses to receive the messages
- EnableSSL: if you want to enable the SSL connection when it sends messages
So, this configuration is pretty standard and you can use other providers.
Read the SmtpCredentials configuration
Now, I have to read the settings from appsettings.json. First, I have to create a model for that: under the folder Models, I created a new folder Settings. Here, I have created a new class called SmtpCredentialsSettings.cs
using System;
using System.Collections.Generic;
using System.Linq;
using System.Threading.Tasks;

namespace AdminLTEWithASPNETCore.Models.Settings
{
    public class SmtpCredentialsSettings
    {
        public string MailFrom { get; set; }
        public string Username { get; set; }
        public string Password { get; set; }
        public string Server { get; set; }
        public int Port { get; set; }
        public bool EnableSSL { get; set; }
    }
}
Now, using the native dependency inject in .NET, I’m going to add the configuration. The following code is part of Startup.cs and if you want to see the full implementation, you have the code on GitHub.
public void ConfigureServices(IServiceCollection services)
{
    // ...
    services.Configure<SmtpCredentialsSettings>(Configuration.GetSection("SmtpCredentials"));
    services.AddScoped(cfg => cfg.GetService<IOptions<SmtpCredentialsSettings>>().Value);
    /// ,,,
}
IEmailSender implementation
Now, I have to implement the interface IEmailSender that allows me to tell Microsoft Identity to send a validation message when a new user is registered or recovering its password. For that, I’m using a simple System.Net.Mail. The code is this:
using AdminLTEWithASPNETCore.Models.Settings;
using Microsoft.AspNetCore.Identity;
using Microsoft.AspNetCore.Identity.UI.Services;
using Microsoft.AspNetCore.WebUtilities;
using System;
using System.Collections.Generic;
using System.ComponentModel;
using System.Linq;
using System.Net.Mail;
using System.Text;
using System.Threading.Tasks;

namespace AdminLTEWithASPNETCore.Services
{
    public class EmailSender : IEmailSender
    {
        private readonly UserManager<IdentityUser> _userManager;
        private readonly SmtpCredentialsSettings _settings;
        static bool mailSent = false;

        public EmailSender(UserManager<IdentityUser> userManager, SmtpCredentialsSettings settings)
        {
            _userManager = userManager;
            _settings = settings;
        }

        public Task SendEmailAsync(string email, string subject, string htmlMessage)
        {
            string emailState = "Sent";

            SmtpClient client = new SmtpClient(_settings.Server, _settings.Port);
            client.EnableSsl = _settings.EnableSSL;
            client.Credentials = new System.Net.NetworkCredential(_settings.Username, _settings.Password);
            client.SendCompleted += new SendCompletedEventHandler(SendCompletedCallback);

            MailAddress from = new MailAddress(_settings.MailFrom, String.Empty, System.Text.Encoding.UTF8);
            MailAddress to = new MailAddress(email);
            MailMessage message = new MailMessage(from, to);
            message.Body = htmlMessage;
            message.BodyEncoding = System.Text.Encoding.UTF8;
            message.IsBodyHtml = true;
            message.Subject = subject;
            message.SubjectEncoding = System.Text.Encoding.UTF8;

            client.SendAsync(message, emailState);

            return Task.FromResult(mailSent);
        }

        private static void SendCompletedCallback(object sender, AsyncCompletedEventArgs e)
        {
            // Get the unique identifier for this asynchronous operation.
            String token = (string)e.UserState;

            if (e.Cancelled)
            {
                Console.WriteLine("[{0}] Send canceled.", token);
            }
            if (e.Error != null)
            {
                Console.WriteLine("[{0}] {1}", token, e.Error.ToString());
            }
            else
            {
                Console.WriteLine("Message sent.");
            }
            mailSent = true;
        }
    }
}
Basically, in the constructor the dependency injection injects user manager and SmtpCredentialsSettings. The implementation of IEmailSender I use a SmtpClient to send the message. At this client I add an event handler called SendCompletedCallback for logging.
Next step is to set the Microsoft Identity to use my implementation. In the Startup.cs under ConfigureServices I’m going to add this code:
services.AddTransient<IEmailSender, EmailSender>();
So, this code maps the interface IEmailSender with my implementation. Now, I want to send an email when a new user is registered in the website. Open the file /Areas/Identity/Pages/Account/RegisterConfirmation.cshtml.cs and change DisplayConfirmAccountLink = false;
using Microsoft.AspNetCore.Authorization;
using System.Text;
using System.Threading.Tasks;
using Microsoft.AspNetCore.Identity;
using Microsoft.AspNetCore.Identity.UI.Services;
using Microsoft.AspNetCore.Mvc;
using Microsoft.AspNetCore.Mvc.RazorPages;
using Microsoft.AspNetCore.WebUtilities;

namespace AdminLTEWithASPNETCore.Areas.Identity.Pages.Account
{
    [AllowAnonymous]
    public class RegisterConfirmationModel : PageModel
    {
        private readonly UserManager<IdentityUser> _userManager;
        private readonly IEmailSender _sender;

        public RegisterConfirmationModel(UserManager<IdentityUser> userManager, IEmailSender sender)
        {
            _userManager = userManager;
            _sender = sender;
        }

        public string Email { get; set; }

        public bool DisplayConfirmAccountLink { get; set; }

        public string EmailConfirmationUrl { get; set; }

        public async Task<IActionResult> OnGetAsync(string email, string returnUrl = null)
        {
            if (email == null)
            {
                return RedirectToPage("/Index");
            }

            var user = await _userManager.FindByEmailAsync(email);
            if (user == null)
            {
                return NotFound($"Unable to load user with email '{email}'.");
            }

            Email = email;
            // Once you add a real email sender, you should remove this code that lets you confirm the account
            DisplayConfirmAccountLink = false;
            if (DisplayConfirmAccountLink)
            {
                var userId = await _userManager.GetUserIdAsync(user);
                var code = await _userManager.GenerateEmailConfirmationTokenAsync(user);
                code = WebEncoders.Base64UrlEncode(Encoding.UTF8.GetBytes(code));
                EmailConfirmationUrl = Url.Page(
                    "/Account/ConfirmEmail",
                    pageHandler: null,
                    values: new { area = "Identity", userId = userId, code = code, returnUrl = returnUrl },
                    protocol: Request.Scheme);
            }

            return Page();
        }
    }
}
Conclusion
Very long post but at the end the integration with Identity in AdminLTE project is done!
You find all code on GitHub. If you have any question, please use my forum. There is another thing we can do with Microsoft Identity: social logins. Let’s go to talk about social logins in the next post.

4 thoughts on “Integration with Identity in AdminLTE project”