In this blog I have already talked about creating components but now I want to start from the beginning and explain how to write a reusable Blazor component from scratch. This is the first part of a Blazor article series to tell how to create a reusable Blazor component. So, we can use them in our Blazor application independently of the hosting model (Web Assembly or Server-side). If you google a bit, you can find a lot of example like that but I can’t find one example that explain exactly how the interaction works. Here, step by step what I understood.
Then, for more documentation, example and components about Blazor, here same links in this blog:
- Getting Started With C# And Blazor
- Setting Up A Blazor WebAssembly Application
- Working With Blazor’s Component Model
- Secure Blazor WebAssembly With IdentityServer4
- Blazor Using HttpClient With Authentication
- InputSelect component for enumerations in Blazor
- Use LocalStorage with Blazor WebAssembly
- Modal Dialog component for Blazor
- Create Tooltip component for Blazor
- Consume ASP.NET Core Razor components from Razor class libraries | Microsoft Docs
Also, you can download the source code of this post from GitHub.
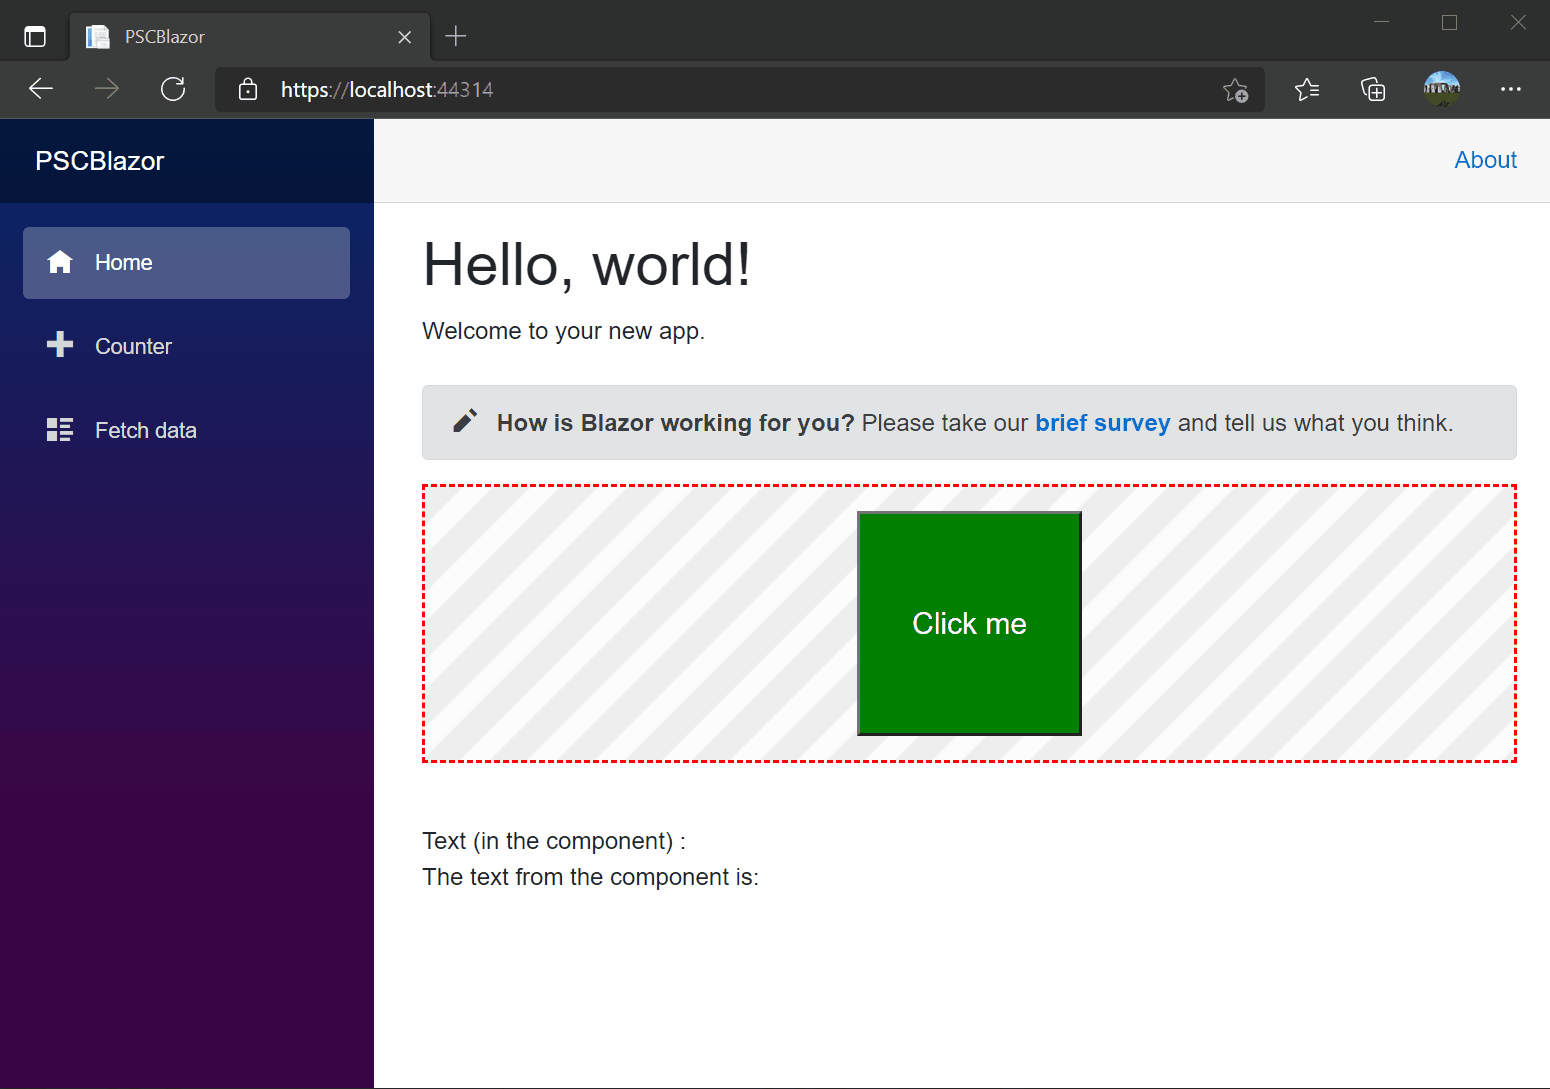
So, there result of this post is a simple button. When you click the button, Blazor calls the code in a javascript file and runs it. The result is passed to the C# code and then as result of the component.
Start!
First, I have to create a new Blazor project. For that, Create a new project and search for Blazor. Then, select Blazor WebAssembly App.

Then, you have to select the name of the project and its location. The name of my project is PSCBlazor and you can find it on GitHub.

Select as Target Framework .NET 5. Then, Create.

Now, we have the main project. But to write a reusable Blazor component, we have to create another project for it. Following the same procedure, create a new project but this time select Razor Class Library.

Then, follow the instruction. The name of my project is PSCBlazor.SimpleComponent.
If you don’t want to use Visual Studio, you can run from the Command Line
dotnet new razorclasslib
By default, the created project contains several elements:
A predefined “Component1” that is a basic component displaying some styled text in Component1.razor.
- A ExampleJsInterop class that demonstrate how to call a basic JS function defined in its own js file in ExampleJsInterop.cs.
- The static resources (like png, css and js files) in the “wwwroot” folder:
– background.png
– exampleJsInterop.js
– styles.css

Separate the code from the razor code
Behind the scenes, when you write a razor page, an actual C# class is generated and hopefully the class is partial. It means that it is easy to separate the behavioral code of your component from the html view code.
Single mixed file Component1.razor:
<div class="my-component">
    This Blazor component is defined in the <strong>PSCBlazor.SimpleComponent</strong> package.
</div>

@code {
}
Sometimes it is nice to separate the view from the code. In Visual Studio is pretty simple. Create a new Class with the full name of the view file plus cs. For example, if the view is Component1.razor the new file should be Component.razor.cs and automatically Visual Studio understands that this file is part of the view.

Then, a little change in the code because the new class must be a partial class. For example:
using System;
using System.Collections.Generic;
using System.Linq;
using System.Text;
using System.Threading.Tasks;

namespace PSCBlazor.SimpleComponent
{
	public partial class Component1
	{
	}
}
Interop between Blazor and JavaScript
Now, I write a reusable component for Blazor and I’m going to modify the component to be able to exchange some data between the component itself and the parent. For that, I have to use a JS function through the generated ExampleJsInterop to prompt the user for a text input.
The component will be used this way with TextValue being a property used in the binding:
<Component1
    ParentName=”Some text I want to transmit from the parent to the child component”
    @bind-Text=”TextValue”>
</Component1>
Define the parameters
We need to define a property ParentName to transmit some data from the parent to the child component:
[Parameter]
public string ParentName { get; set; }
The Parameter attribute tells that the C# property can be used as component parameter.
Now, I need to define a parameter to be able to transmit data to the child component, but we also want to get data from the component using a @bind property.
To make it possible, I have to define a parameter like the previous one named in our case Text.
[Parameter]
public string Text { get; set; }
Define a EventCallback parameter to be able to notify the binding engine that the value has changed. As a convention, the name of the event callback property must be named accordingly to the property you want to bind. In our case it must be named TextChanged.
[Parameter]
public EventCallback<string> TextChanged { get; set; }
The name of the event callback can be named differently but in that case it is required to specify it when binding a value using
@bind-{Property}:event=”NameOfPropertyChanged”
It means that the two notation are equivalent when binding a value:
<Child @bind-MyProperty="Text" />
<Child @bind-MyProperty="Text" @bind-MyProperty:event="TextChanged" />
Once the properties are defined, the component will have to invoke the event callback when the property value is changing.
await TextChanged.InvokeAsync(valueOfUserTextInputFromModalDialog);
Inject the appropriate services
To use the Java Script interop and the ExampleJsInterop example class we have to use an injected instance of IJSRuntime. We can do it with a dedicated attribute Inject in the component C# file.
Implement the behavior
Now, I have all we need to implement the behavior by adding a button with a click handler that is going to call the JS function through the ExampleJsInterop.Prompt method. Once we got the result we just need to forward to the TextChanged event call back and to update our Text property value.
So, in the razor file I created a bit of HTML, just to have a bit more fun.
<div class="my-component">
	<div class="my-buttonkeeper">
		<button class="my-button" @onclick="GetTextAsync">Click me</button>
	</div>
</div>
<br />
<text>Text (in the component) : @Text</text>
<br />
Then, in the Component1.razor.css I added some CSS code
.my-component {
    border: 2px dashed red;
    padding: 1em;
    margin: 1em 0;
    background-image: url('background.png');
}

.my-buttonkeeper {
    text-align: center;
}

.my-button {
    width: 150px;
    height: 150px;
    background-color: green;
    color: white;
    font-size: 20px;
}
Why? Because I want to be sure the main application adds the CSS from this component but also the javascript we need. I’ll explain that in a second.
Then, it is the moment of the CS file:
private async Task GetTextAsync()
{
    // Call JS interop.
    var text = await new ExampleJsInterop(JsRuntime).Prompt("Enter some text:");

    // Trigger the changed event.
    await TextChanged.InvokeAsync(text);

    // Set the property value.
    Text = text;
}
Inside wwwroot directory we have ready to use exampleJsInterop.js file which was created by Visual Studio or CLI. The code is like that
// This is a JavaScript module that is loaded on demand. It can export any number of
// functions, and may import other JavaScript modules if required.

export function showPrompt(message) {
  return prompt(message, 'Type anything here');
}
This is a simple javascript function. This rings a bell to me, it is like in React. Now, the magic is happening in the ExampleJsInterop.cs
using Microsoft.JSInterop;
using System;
using System.Threading.Tasks;

namespace PSCBlazor.SimpleComponent
{
	// This class provides an example of how JavaScript functionality can be wrapped
	// in a .NET class for easy consumption. The associated JavaScript module is
	// loaded on demand when first needed.
	//
	// This class can be registered as scoped DI service and then injected into Blazor
	// components for use.

	public class ExampleJsInterop : IAsyncDisposable
	{
		private readonly Lazy<Task<IJSObjectReference>> moduleTask;

		public ExampleJsInterop(IJSRuntime jsRuntime)
		{
			moduleTask = new(() => jsRuntime.InvokeAsync<IJSObjectReference>(
			   "import", "./_content/PSCBlazor.SimpleComponent/exampleJsInterop.js").AsTask());
		}

		public async ValueTask<string> Prompt(string message)
		{
			var module = await moduleTask.Value;
			return await module.InvokeAsync<string>("showPrompt", message);
		}

		public async ValueTask DisposeAsync()
		{
			if (moduleTask.IsValueCreated)
			{
				var module = await moduleTask.Value;
				await module.DisposeAsync();
			}
		}
	}
}
So, between the lines 24 and 28 there is a call via IJSObjectReference to the javascript function in the file under the wwwroot. You can see that in line 21 where there is an import of the javascript file.
Run the demo project
So, almost finish to write a reusable Blazor component with interop with javascript. First, I have to add the component as dependency in the project. In Solution Explorer, right click on Dependecies in the PSCBlazor and click on Add project references… Then, select the component.

Now, open _Imports.razor and add the reference to this component to add this line
@using PSCBlazor.SimpleComponent
Then, open Index.razor and add this code
<Component1 ParentName="This is a test" @bind-Text="_text"></Component1>

The text from the component is: @_text

@code {
	private string _text = "";
}
Also, we want to add the CSS and the javascript for the magic. Depending on the hosting model, it is required to add the reference to the CSS and javascript in specific index files in the application project:
wwwroot/index.html for the Web Assembly hosting model.
and
Pages/_Host.cshtml for the Server-side hosting model.
So, open the index.html under wwwroot and add those lines (I deleted a lot of lines for the purpose of showing what you have to add):
<head>
    <link href="_content/PSCBlazor.SimpleComponent/styles.css" rel="stylesheet" />
</head>

<body>
    <script src="_framework/blazor.webassembly.js"></script>
    <script src="_content/PSCBlazor.SimpleComponent/exampleJsInterop.js" />
</body>
Basically, in the head I have to add the reference to the CSS from the component. Similarly, I have to do the same to add the javascript.
Compile and run. If everything is ok, you have the same result as I show at the top of this post.


One thought on “Write a reusable Blazor component”